
01When you need this
A bot normally answers the person in front of it. Sometimes it also has to tell somebody else:
- Someone submitted something and a person on your team has to see it — an order, a lead, a support request.
- You want a copy of every form, payment or error in a log channel or an internal group.
- An admin has to approve or reject something by pressing a button.
FlowCastle has four tools for this. They are not interchangeable:
- Service Notification — a one-way alert to your own team. The simplest one. No setup.
- Notify by Tag — a message from your bot to every contact with a tag, such as
admin. No buttons. - Send to — one message delivered to a chat you choose instead of the current one. Buttons allowed.
- Audience scope — a whole flow that runs for other contacts picked by a filter. For advanced cases; it is covered at the end.
You never need a second bot or custom code for any of this.
02Service Notification — the simplest way
- Add an Action block at the point where the alert should go out.
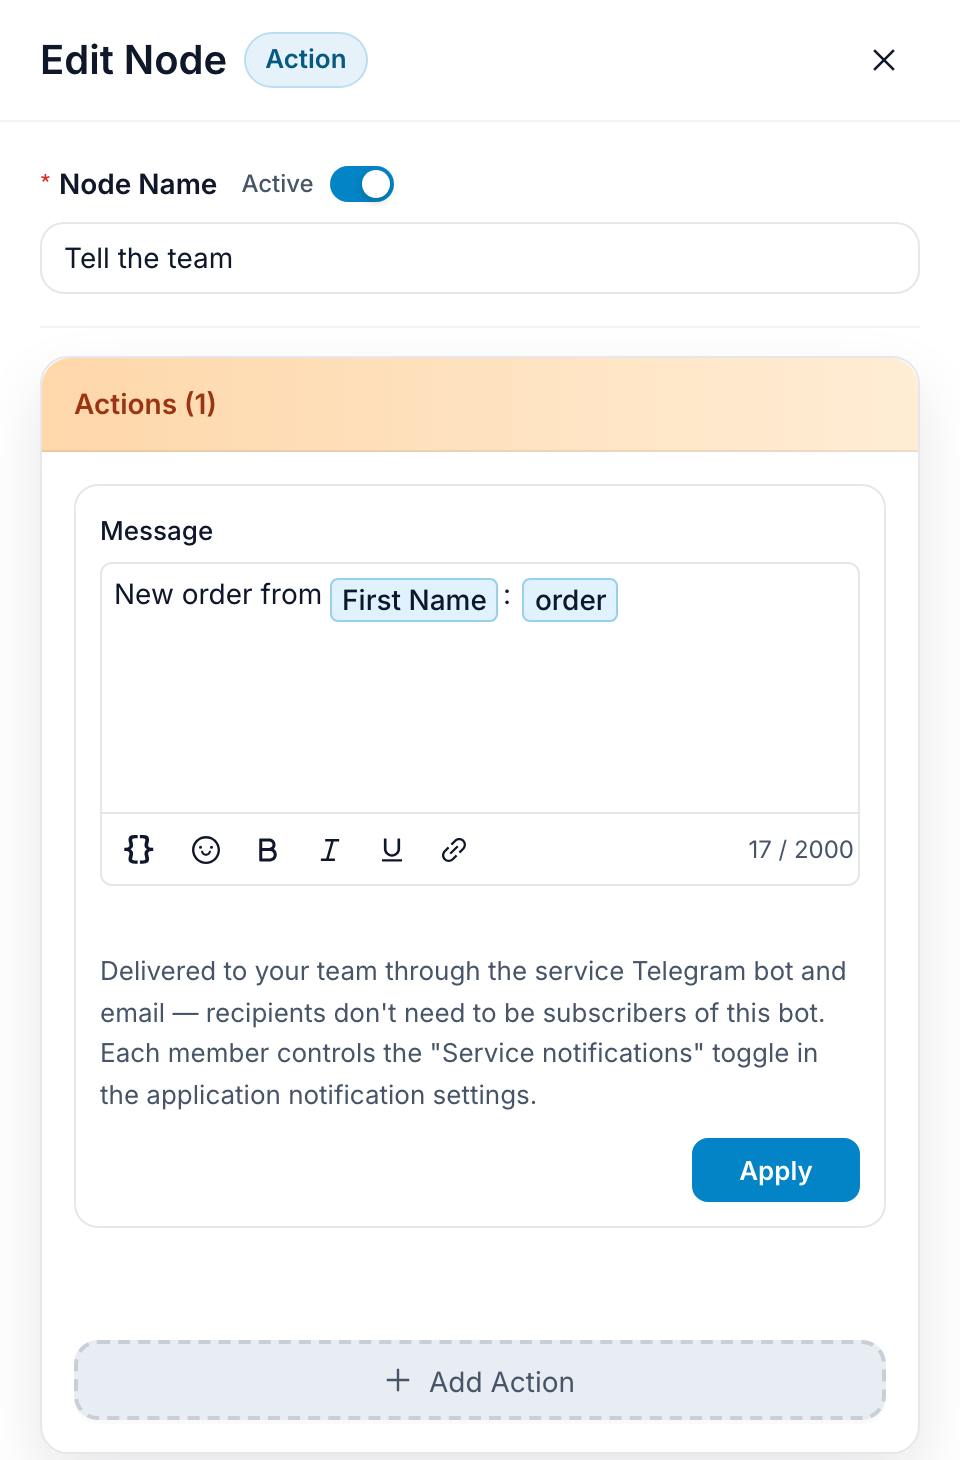
- Click Add Action and pick Service Notification. In the menu it reads: Notify your team via the service bot and email — works from any channel.
- Type your text into Message. You can insert variables, for example
New order from {{sysvar|firstName}}. They are filled in with the details of the person who started the flow.
Under the field the editor explains:
Delivered to your team through the service Telegram bot and email — recipients don't need to be subscribers of this bot. Each member controls the "Service notifications" toggle in the application notification settings.
Who gets it. The people who have access to this workspace and have Service notifications switched on in their notification settings. It is on by default. Nobody outside the workspace can receive it.
How it arrives. Through FlowCastle's own service Telegram bot and by email. Your bot is not involved, so this works from any channel — Telegram, web chat, email, or a scheduled operation.
Identical messages collapse. If the exact same text goes out twice within 60 seconds, only the first is delivered. Put a name, an order number or an amount in the text, and every alert gets through.
What it cannot do: reach anyone outside your team, show buttons, or send anything back into the flow.
03Notify by Tag — alert admins through your own bot
Use this when the people who should know are contacts of this bot — they have started it at least once. In the menu it reads: Send a message to every contact with a tag (e.g. admins).
- In Contacts, give your admins a tag, for example
admin. - In the flow, add an Action block with the Notify by Tag action.
- Pick the tag and write the message.
When the flow reaches this step, the bot sends the text to every contact with that tag. Variables are filled in with the details of the customer who started the flow, not the admin's.
Notify by Tag also works in Operations — the scheduled runs with nobody in the chat. A group or channel your bot is in is a contact too, so give it a tag and a scheduled operation can post a report into that chat. There is no customer in an operation, so use application variables and step results in the text.
Two differences from Service Notification:
- It comes from your bot. Admins see it in their chat with your bot. People who never started the bot get nothing.
- No buttons, and nothing comes back into the flow. If one admin has blocked the bot, the others still get the message.
04Send one message to a specific chat
Every message block can go to a different chat than the current one. This works for a log channel, an internal group, or one admin's private chat.
- Open the message block.
- Scroll to Send to. It shows Same chat by default. Click Change.
- Pick Specific chat.
- Choose the chat with one of the three tabs:
- Contact — search the people, groups and channels your bot already knows. The easiest option.
- Variable — insert a variable that holds the chat ID.
- Chat ID — type the numeric chat ID, or the @username of a public group or channel.
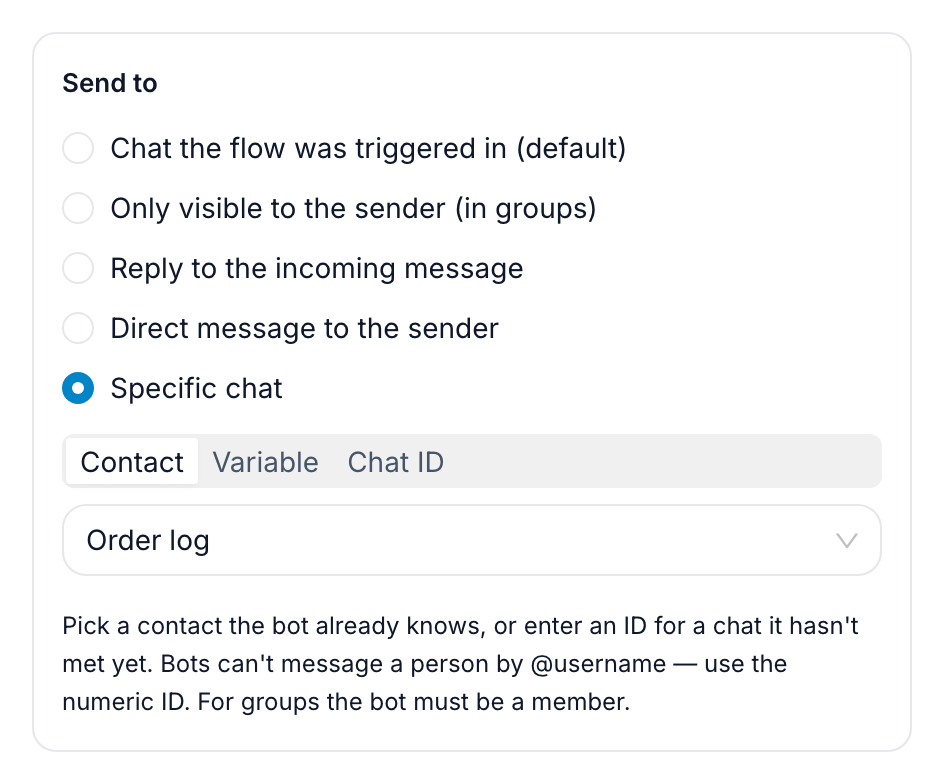
The hint under the field sums up the rules:
Pick a contact the bot already knows, or enter an ID for a chat it hasn't met yet. Bots can't message a person by @username — use the numeric ID. For groups the bot must be a member.
So, in practice:
- To a group or channel: add your bot to it first, then pick it on the Contact tab (or type its @username or ID).
- To a person: they must have started your bot. Pick them on the Contact tab. Typing a person's @username does not work.
- To yourself, the owner: pick Workspace owner instead of Specific chat. There is nothing to choose and no ID to store. The bot sends the message to the Telegram account you signed in to FlowCastle with, or the one you connected in Settings → Notifications. You must have pressed Start in your bot once.
A message for the owner or for a specific chat is never sent to the wrong person. If no owner Telegram account is connected, the owner never started the bot, or the chosen chat comes out empty (for example a variable with no value yet), the message is not sent and the flow log shows a warning.
The other Send to options are Chat the flow was triggered in (default), Only visible to the sender (in groups), Reply to the incoming message and Direct message to the sender.
The Send to section appears for Telegram. You can set it up before your bot is connected — the editor then reminds you: You can configure this now. Connect a Telegram bot before deploying the flow.
Buttons work too. Put Approve / Reject buttons on the message and send it to the admin. When the admin presses one, the flow continues from that button — as the admin, in the admin's chat. That is what you want for an approval: the next steps (a confirmation, a tag) run for the admin.
One catch: after the button press, the flow no longer knows who sent the original request. Before sending, copy what you need (the customer's Telegram ID, the submitted value) into an application variable, and read it back after the press.
Delivery settings take effect when you deploy. After changing one, deploy again.
05Which one should I use?
| Service Notification | Notify by Tag | Send to → Specific chat | Audience scope | |
|---|---|---|---|---|
| Who receives it | Your workspace team | Every bot contact with the tag | One chat you choose: a group, a channel, or a person who started the bot | Any contacts a filter matches |
| Buttons? | No | No | Yes | Yes |
| Several steps? | No, one alert | No, one message | One message; buttons can continue the flow | Yes, a whole flow |
| Recipient must have started the bot? | No | Yes | Only for a private chat | Yes |
Rough rule: alert yourself or your team → Service Notification. Alert admins who use the bot → Notify by Tag. One message to a chat you can name, with or without buttons → Send to. Many recipients picked by a filter, or several steps for each → Audience scope.
06For advanced users: audience-scoped flows
Use this when the recipients are a set of contacts — every admin, every moderator of a region — or when several steps must run for each of them. Then the flow itself has to run for those people.
Audience scope is a toggle in the flow editor toolbar. Its tooltip explains:
Audience-scoped flows can run for any contacts matched by the recipient filter, not only for the contact currently interacting with the bot. This stays in Automation and does not create a broadcast in the Broadcasting section.
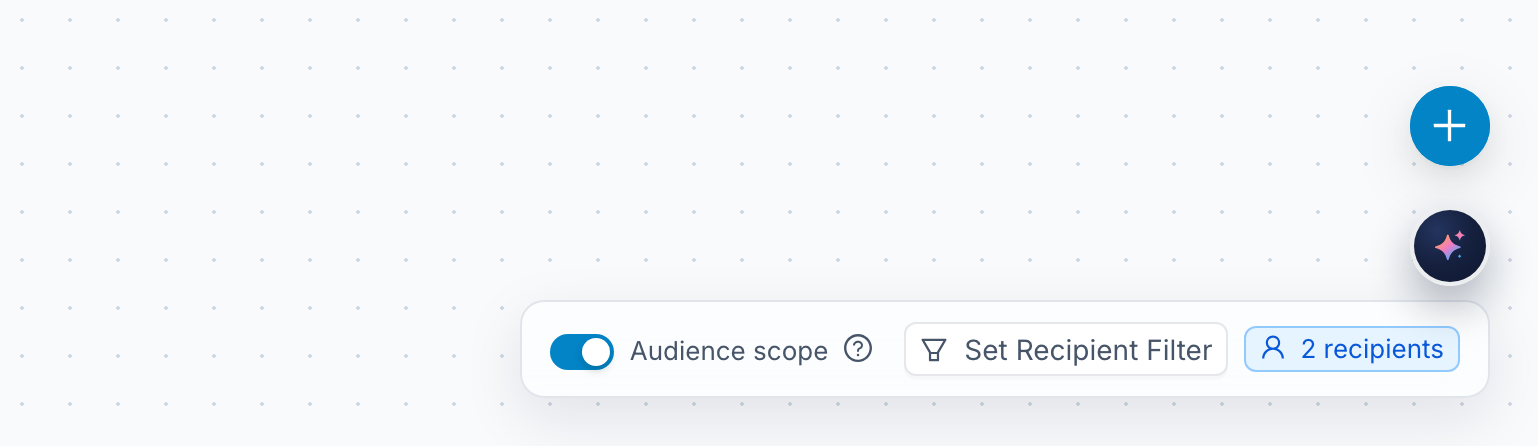
Next to the toggle, Set Recipient Filter opens the Recipients panel. You build conditions the same way as in a Condition block, and the footer shows how many contacts match right now.
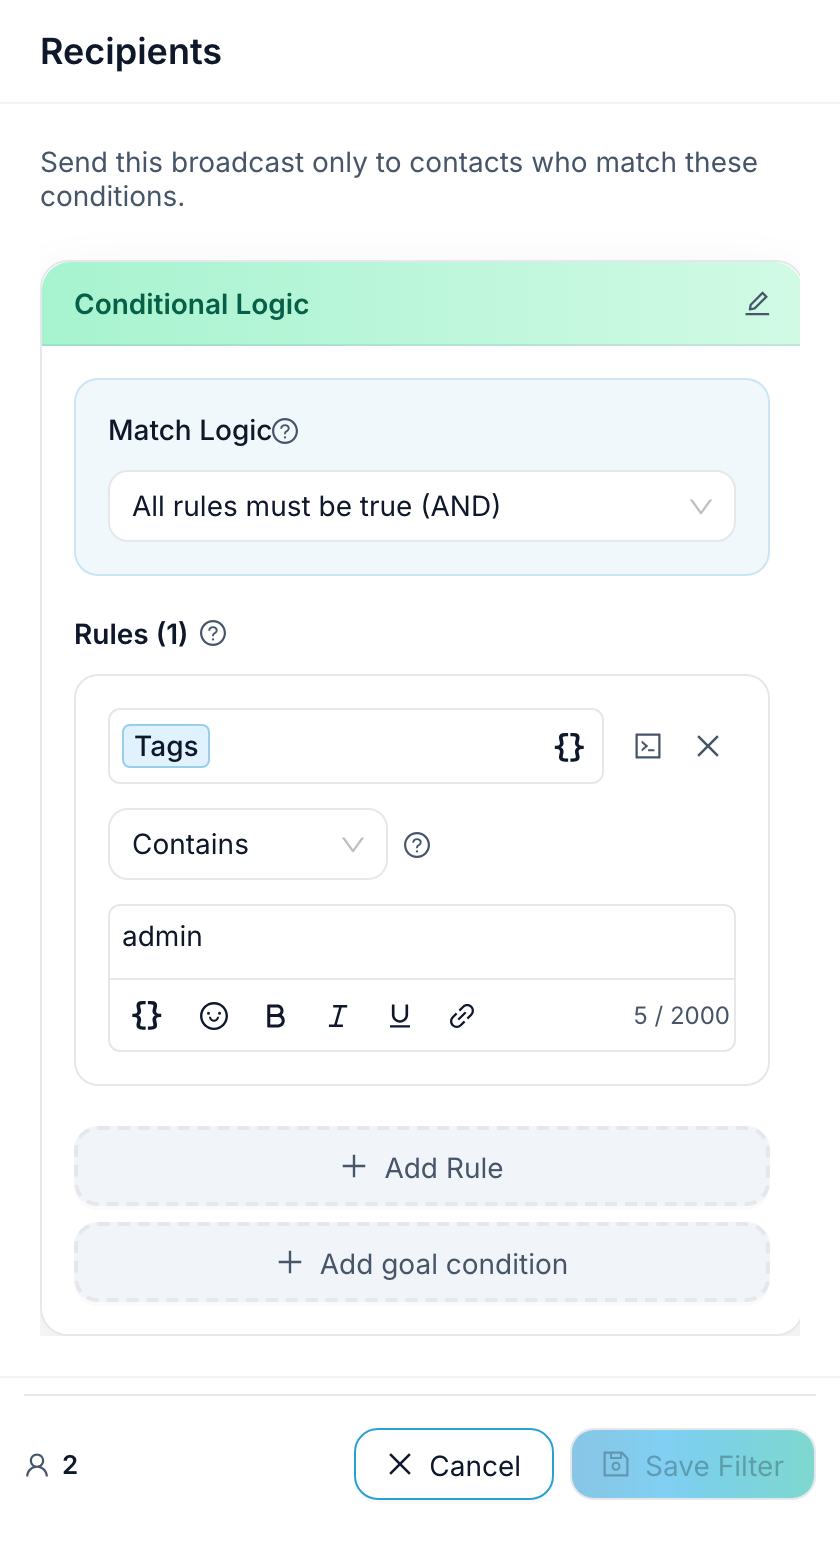
Conditions can use contact variables, contact details (platformId, username, email, phone, firstName, lastName, tags) and goals. To match exactly one admin, use {{sysvar|platformId}} Equals their numeric Telegram user ID, or {{sysvar|tags}} Contains a tag only they have. Either way, the admin must have started the bot, or the filter finds nobody.
The recipe
- Create a second flow and call it Notify admin.
- Turn on Audience scope and set the recipient filter so it matches only your admins. Give this flow no trigger of its own.
- Inside it, put the message with Approve / Reject buttons and everything that follows.
- In your main flow, add a Flow Link block and set Target Flow to Notify admin.
When the main flow reaches the Flow Link, FlowCastle runs the notify flow once for each matched contact, in that contact's own chat. When an admin presses Approve, the rest of the flow runs for that admin.
To show the customer's data in the admin's message, save it to an application variable in the main flow and read it there. The recipient filter can also read the customer's variables with {{sourceVar|<variable-id>}}. There is no picker for it — you type it into the condition's value by hand, and it works only in the filter, not in message text.
07Next up
All of these live inside blocks you drop on the canvas. Here is the rest of what a bot can do between messages: The Action Node: Everything Your Bot Can Do